Finally, as promised some time before, I am posting the tutorial for sailor collar today. I attached this collar on a popover A-line dress. I am extremely sorry for the delay. It took more time to create the tutorial than to actually sew the dress. Finally, it is out today.

Collar front:

Collar back:

How to draft the sailor collar:
First, lay out the front and back of the dress pattern .

With the front and back necks touching, place the front bodice shoulder tip on the back bodice shoulder tip with an overlap of about 0.5 inch.

Trace the center front, neckline, and center back. Mark the front bodice shoulder tip on the paper.

Decide the front and back collar length and mark them on the paper. I kept mine 4 inches at the front and 6 inches at the back. You can make sailor collar in different styles. For this type of sailor collar, I kept a deep front neck and then attached an one-side-open inset instead of a button-down front.

Square a line from the point on the center back and draw the sailor collar connecting the points (as shown in the image below). Slightly curve the outside edges of the collar's front side.

Trace this to get the collar pattern piece.

Square a line 1.5 inches down from the center front. This is for drafting the inset piece.
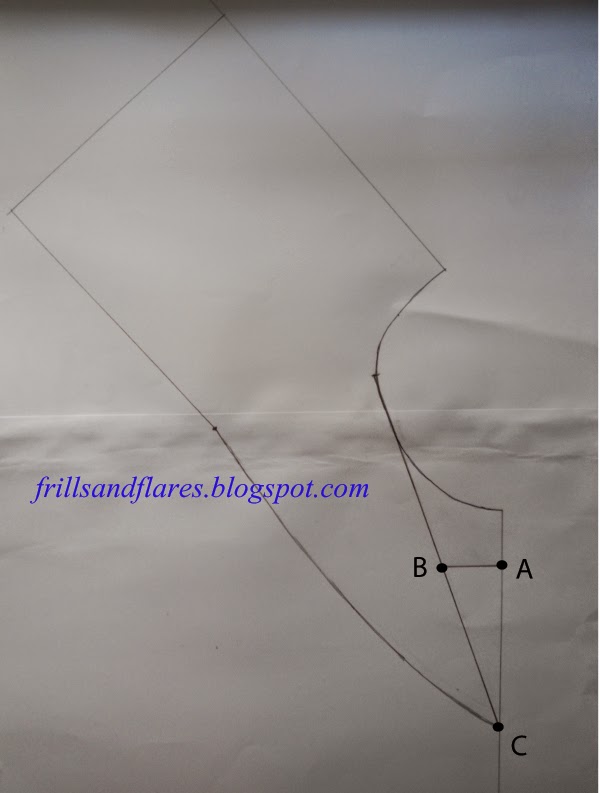
Trace ABC to get the inset piece.

You will have to change the front neckline of your dress or blouse to the shape of the collar. Place the collar over the front neckline as shown.

Trace along the neckline edge from the shoulder point at neck.

Cut through this line. This will be your new front neckline.

Cut out the front and back of the dress.
Now you will have to draft the neck facings.
Back neck facing:
Place the tracing paper over the dress back pattern and trace as shown.

Cut it off. This is your back neck facing. (I copied it again on a white paper.)

Front neck facing:
Trace the front neck facing as shown.

Front neck facing:
Trace the front neck facing as shown.

Place the inset piece you drafted earlier as shown in the photo below.

Extend the top of the inset piece to include the front neck facing as in the photo below and trace all around.

The purpose of doing this is to set the width of the hidden part of the inset piece same as that of the facing, so that when we sew it together with the facing, the wrong side of the neck will also look neat.

How to cut the pattern pieces:
Add seam allowances (3/8 inch) to the pattern pieces.
Now, cut 2 collar pieces on fold. One for upper layer and the other for lower layer. (Sorry for the bad light that shows the white fabric yellowish.)

Cut two inset pieces on fold. One is main, and the other is lining.

Cut back neck facing on fold.

Cut front neck facing on fold.

How to make the sailor collar:
Sew in bias tape or satin ribbon in a contrast color (blue or red is usually used) as shown.
(Please use a lightweight fabric for bias tape. I made a big mistake of choosing a wrong fabric for the bias tape. It was heavier than the collar fabric. That's the reason for the puckering.)


With right sides facing, pin the outer edges of the two collar layers together, leaving out the neckline edge open.

Sew them together on the pinned edges with a seam allowance of 3/8 inch.

Trim the edges using pinking shears and clip the corners.

Turn the collar inside out. Using chopsticks or any other sharp tool, push the corners of the collar to make them nice and crisp, and also shape the edges. Press the collar with lot of steam.

Can you notice the markings on both sides of the collar? These were traced from the paper pattern earlier.

We will match these with the shoulder points when we attach it to the neckline of the dress .
How to make the inset:
First, sew in the same color bias tape or ribbon, which you used for the collar, on the right side of the main inset piece, 1/2 inch from the top edge.

With wrong sides facing together, join the the main piece and the lining piece on the sides, leaving the top edge open. (You can also leave one of the side edges open instead of the top edge, if you don't like stitches showing at the top.) Trim the edges of the sides.

Fold down 1/4 inch from the top.

Turn the inset inside out.

Sew close the opening (sorry, I didn't take a photo for this step).
How to attach the collar to the dress:
First, with right sides facing, pin and sew the shoulder seams of the dress.

Open the seams and press.

Pin the neck edge of the collar to the neckline of the dress.

Once you have positioned the collar well, sew all around.

Join the front and back neck facings.

Open the seams and press.

With the right sides of the collar and the facing touching, sew the facing all around the neck, matching the seams with seams at the shoulder. You can use fusible interfacing with the facing if you prefer.

Hem or serge the outer edge of the facing and trim the neckline with pinking shears.

Press the facing down the wrong side of the dress and understitch. There is a good tutorial for understitching here. (Be careful not to catch the collar while you understitch. On the right side of the neckline, the understitching will be hidden under the collar.)

Hem the back neck facing if you prefer. I did it later.
Attaching the inset:
This step is optional. You can attach the inset or leave the collar as is. An inset is used to control the deep V-neck and adds style.
Attach one side of the inset to one side of the front facing to secure it, as shown below. Be careful not to catch the collar under while you attach the inset.


Attach three small press studs (snap fasteners) on the inset like so.

Now make a bow and attach it at the bottom of the collar. You have finished making the sailor color!

You can find lots of free PDF printable sewing patterns on this page on my blog. You can download and use them to create your own clothes.
You can also click the Free Sewing Patterns Page at the top of this blog page (under the blog title) to find more free sewing patterns.
Click the below links to browse through all the pattern drafting and sewing tutorials on my blog.